No Text While Driving, Part 2
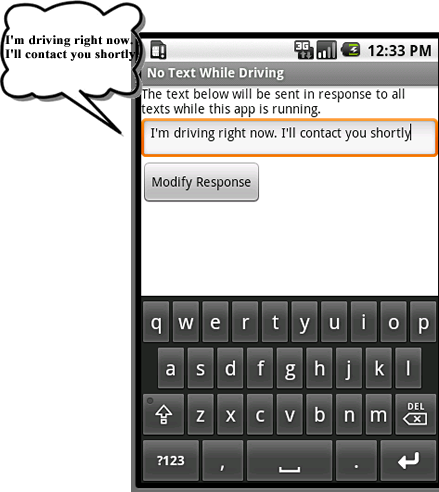
You know that texting while driving is dangerous, so you've created and installed the No Text While Driving app on your phone. Now, when you drive you open that app and let it auto-respond to incoming texts.
But the jingle of the texts coming in is killing you with curiosity-- wouldn't it
be great if you could hear the texts spoken aloud? With Part II of the tutorial,
you'll extend the app so that it speaks out both the message and who sent it. And
since you're making some changes anyway, you'll modify the auto-response so it
reports your whereabouts in the reply: "Sorry, I'm driving and I'm at 1600
Pennsylvania Avenue".
Before completing this tutorial you should complete part I.
Getting Started
For this app to work, you'll need to load a text-to-speech module, Text-To-Speech Extended, on your phone. App Inventor and other apps rely on this module for the underlying voice synthesis. If you don't already have it, you can download onto your phone using the Android Market:
- On your phone, open the Market app
- Search for TTS
- Select the app Text-To-Speech Extended to install
Once the Text-To-Speech module is installed, open it to test its features. When it opens, set the default language as desired. Then select "Listen to Preview". If you don't hear anything, make sure the volume on your phone is turned on. You can also change the default Engine which can enhance the quality of the spoken words.
Once the Text-To-Speech module is installed and configured as desired, you can use the TextToSpeech component within App Inventor. Begin by opening App Inventor and your NoTextWhileDriving project from part I. SaveAs the project and name the new copy "NoTextWhileDriving2".
What you'll learn
The app demonstrates two powerful components:
- The LocationSensor component to determine the phone's location, and
- The TextToSpeech component to speak the incoming texts aloud.
These components encapsulate some advanced functionality, but using them in
building an app is relatively straight-forward.
Set up the Components
Leave the user interface for NoTextWhileDriving, part II the same as in part I. But in the Component Designer, add two non-visual components: a LocationSensor and a TextToSpeech component. You do not need to set any properties of the components.
Add behaviors to the components
The behavior for part I of No Text While Driving was: "when a text is received, the message the user has put in MessageTextbox is sent as a text message response to the sender."
For part II, the behavior will be changed to: "when a text is received, it is spoken aloud and a message, including the text in MessageTextbox and the phone's current location, is sent in response to the sender.
Speaking the text aloud
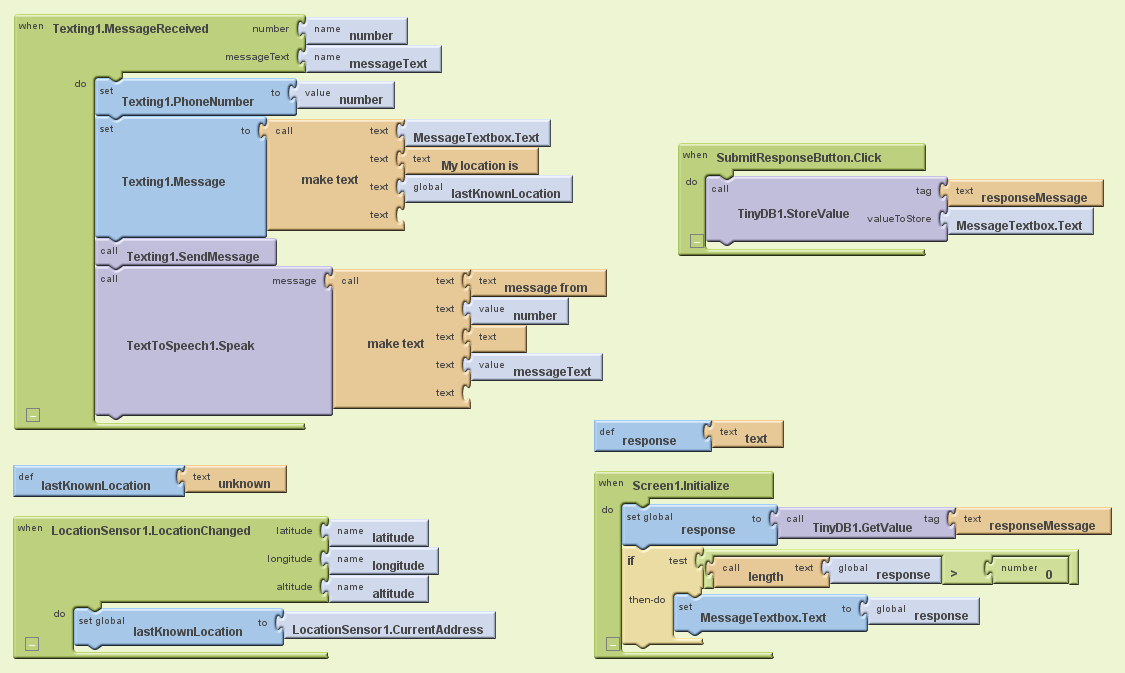
When a text message is received by the phone, the Texting.MessageReceived event is triggered. The blocks from Part I handle this event by setting the PhoneNumber and Message properties of the Texting component appropriately and then sending the response text.
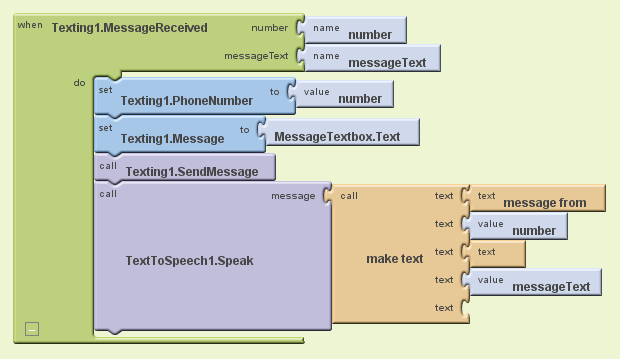
Extend the blocks from Part I by using the TextToSpeech component to speak both the sender's phone number and the message. You'll add the following blocks to the exisiting Texting.MessageReceived blocks:
| Block Type | Drawer | Purpose |
| TextToSpeech1.Speak | TextToSpeech1 | speak out the message received |
| make text | Text | build the words that are to be spoken |
| text "message from " | Text | First words spoken, put a space at end |
| number | My Definitions | This is the number the original text was received from |
| text " " | Text | Put a space in between number and message |
| messageText | My Definitions | This is the original message received |
The blocks should look like this:
How the Blocks Work
After the response is sent, the TextToSpeech1.Speak functon is called. You can plug any text object into the message slot of the Speak function. In this case, make text is used to build the words to be spoken, including the text "message from", the phone number from which the message was received (number), a blank text, and the message received (messageText). If the text "hello" was received from the number "111-2222", the words "message from 111-2222. hello." would be spoken.
Test the behavior. You'll need a second phone to test the behaviors in this app. From the second phone, send a text to the phone that is running the app. Does the second phone speak the text aloud? Does it still send an automated response?
Adding location information to the auto-response
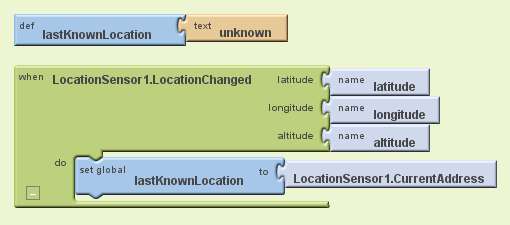
Next, add a LocationSensor.LocationChanged event handler which places the current address into a variable, lastKnownLocation. When a text comes in, the value of that variable can be added to the response message. Here are the blocks you'll need:
| Block Type | Drawer | Purpose |
| def variable (lastKnownLocation) | Definitions | create a variable to hold the last read address |
| text ("unknown") | Text | set the default value in case the phone's sensor is not working |
| LocationSensor1.LocationChanged | LocationSensor1 | this is triggered on the first location reading and every change. |
|
set lastKnownLocation to |
My Definitions |
set this variable to be used later. |
| LocationSensor1.CurrentAddress | LocationSensor1 | this is a street address such as "2222 Willard Street, Atlanta, Georgia" |
Here are the blocks:
How the Blocks Work
LocationSensor1.LocationChanged is called the first time the sensor gets a reading and each time the phone is moved enough to trigger a new reading. These blocks just place the current (street) address into the variable lastKnownLocation, which you'll use later when you change the auto-response that is sent out.
Modify the message with location information
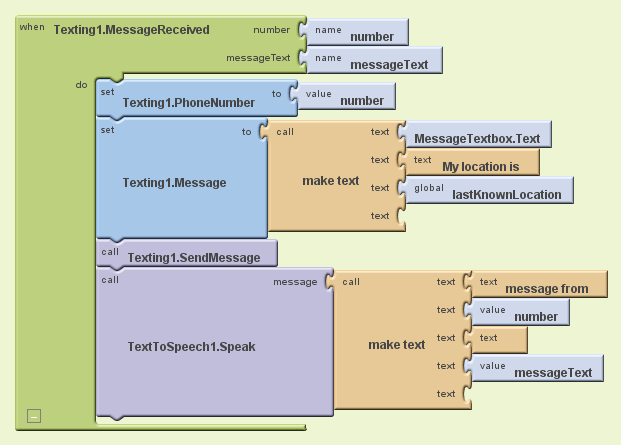
Next, modify the Texting1.MessageReceived event-handler so that the current address is added to the response. You'll need the following blocks:
| Block Type | Drawer | Purpose |
| make text | Text | if there is a location reading, build a compound text object |
|
MessageTextBox.Text |
MessageTextBox |
this is the (custom) message in the text box |
| text ( "My location is:") | Text | This will be spoken after the custom message (note the leading space) |
| global lastKnownLocation | LocatonSensor | This is an address such as "2222 Willard Street, Atlanta, Georgia" |
The blocks should look like this:
How the Blocks Work
Instead of directly sending a message of the text in MessageTextbox.Text, the app first builds a message using make text. It combines the response text in MessageTextBox.Text with the text " My location is " and then the variable lastKnownLocation.
Test the behavior. From the second phone, send a text to the phone that is running the app. Does the second phone receive the response text? Does it include location information?
Final Program
Variations
Once you get the app working, you might want to explore some variations. For example,
- Write a version that lets the user define custom responses for particular phone numbers.
- Write a version that sounds an alarm when a text is received from a number in a "notify" list.
Review
Here are some of the ideas covered in this tutorial:
- The TextToSpeech component takes any text object and speaks it aloud. It relies on an Android module, Text-To-Speech Extended, which must be downloaded to the phone for the app to work.
- make text is used to piece together (concatenate) separate text items into a single text object.
- The LocationSensor component can report the
phone's latitude, longitude, and current street address. To ensure that it has a
reading, you should access Its data in its LocationChanged event-handler, which is triggered the first
time a reading is made and on every change thereafter.
Scan the Sample App to your Phone
Scan the following barcode onto your phone to install and run the sample app.
Download Source Code
If you'd like to customize this sample in App Inventor, download the source code to your computer, then open App Inventor, go to the My Projects page, and choose More Actions | Upload Source.Google is grateful to Professor David Wolber, CS Professor at The University of San Francisco, for developing this tutorial.
